Note: Easycoding is designed with one USB Dongle, you do not have to install any driver on your computer, and therefore Easycoding setup is easily to do. Easycoding Setup Steps: 1. Open moveable hard disk; it contains two files, including “EasyCoding User Manual V1.0.pdf" and "Setup_ENUS_V1.1.2.141226"
2. Open "Setup_ENUS_V1.1.2.141226", a window pops up named "Setup-BMWEasyCoding", click "Next" to continue the BMWEasyCoding Setup Wizard.
3. According to the prompt to complete the BMWEasyCoding Setup Wizard.
4. A window pops up reading "superdog not found", insert the USB Dongle, then you do not have to install any driver.
5. At the desktop, click "BMWEasyCoding" to open 6. This is BMWEasyCoding menu.
7. Click "Options" to open, there are options including: Version, Language and Network. Software version: 1.1.2.141217 Base Database Version: 1.1.3.141226 Diagnose Database Version Common Coding Database Version Super dog ID
8. Choose EasyCoding Language:
8. After select one language, click "OK", then a window pops up reading " the program will restart", click OK to continue.
9. BMW EasyCoding is availbale with options "Feedback", click it, one window pops up reading “Please send your feedback in the form of words or pictures to ....." 10. Next is to diagnose and do personalized settings.
Product link:http://www.eobd2.fr/easycoding-for-bmw-and-rolls-royce-diagnose-personalized-setting.html
0 Comments
HDS IMMO PCM Code calculator software for Honda vehicle models is free download available in Eobd2.fr. HDS IMMO PCM Code Calculator Highlights: 1) Calculate old version HDS password 1 and password 2. 2) Calculate new version HDS PCM Code calculation. 3) Calculate Honda vehicle with 17 digit VIN number and Japanese produced Honda with 11 Digit VIN. HDS IMMO PCM Code Calculator Free Download: http://down.eobd2.fr/honda-calculator.zip Software is free download, but the software program should work together with USB dongle to calculate codes. How to use HDS IMMO PCM Code Calculator software: 1) Download the software in above link 2) No need to run software, directly run and use. 3) Connect USB dongle to calculate PCM code. 4) Manually enter the VIN when change your vehicle’s ECU/PCM. Your real VIN number may be different from your vehicle stored information.
NOTE: HDS IMMO PCM Code Calculator software is possible to work with various Honda diagnostic systems, like Honda HDS HIM diagnostic tool with double board, VXDIAG MULTI 3 IN 1 Diagnostic Tool for Toyota/ Honda/JLR, Allscanner IT3, GNA600 etc. Problem: When I connect the Carprog and go to open project and to project folder and pick the flash file sample in the profile folder, it connect alright but when I try to get the flash file for 4.74 cp, when I try to connect I get that error... but even though saved in .flash but it connect the dump file I have for the cp , but it connect the dump sample file that is in the project folder that is installed by the jlink, but when I try to connect dump file for cp, it give error. Solution: Carprog reprogramming using JLink Step by step as follows: 1. You need to clear mcu, operate by following this video tutorial. 55 pin in programming is now here connected, Connect to JLink:
Carprog connect to 12V. I reprogrammed the MCU as shown in this video: after reprogramming Mcu, pin 55 connect to Gnd
Product link:http://www.eobd2.fr/carprog-v531-carprog-full-3300.html EASYCODING is a newly developed device for reading BMW and Rolls-Royce fault codes and making vehicle personalized settings. EasyCoding is the first tool which can special in help you set up personalized parameter which you can never miss. See following two pictures to know EasyCoding first.
Following are outstanding advantages for EasyCoding: 1. Support BMW and Rolls-Royce from 2010 to 2014 year 2. Software easy to install and use. With USB Dongle, you no need to install any driver on your computer. Just double-click the desktop icon EASYCODING, then run the software. 3. With “recovery” function if some parameter you changed not suitable for your vehicle,very safe. 4. Support Multi-language: English/ Russian/ German/ French/ Spanish/ Japanese/ Italian/ Korean/ Dutch/ Polish/ Thai/ Turkish/ Czech/ Portuguese/ Indonesian/ Swedish/ Greek (You can choose the language you need when install the software) Software Operation Requirement: System requirement: WINDOWS System, XP SP3, WINDOWS7 and WINDOWS8. Computer requirement: The computer should have at least 2GB system RAM and 4GB HDD space. To know more Easy Coding function according to following pictures:
To know more details, please browse:http://www.eobd2.fr/easycoding-for-bmw-and-rolls-royce-diagnose-personalized-setting.html Some tips and notes have to be highlighted when using Taxtrix Openport 2.0 with ECUflash software, otherwise will lead to the flashing and reading ECU failure.
1) Reading or flashing Subaru or Mitsubishi ECU with ECUflash software can only work with Openport 2.0 interface, no other J2534 cables are possible to do this.
2) Plug the Openport 2.0 interface directly into the computer USB port. Do not use any extension cables or converters. 3) Do not turn on the ignition until the ECUflash prompts you to do so. And then quick press ‘OK’, otherwise reading/flashing may fail. 4) Reading and flashing requires you to enter “test mode” by connecting the green diagnostic connector located above the driver’s side foot well (non-CAN models only). Please make sure you vehicle is actually entering test mode with the green diagnostic connectors connected and the Openport 2.0 cable disconnected. 5) Make sure ECUflash is compatible with your Subaru or Mitsubishi model. Check the vehicle model available in Eobd2.fr webpage. l ANY 2001 and prior USDM Subaru, USDM 2002–2003 non-WRX models, USDM 2004 Impreza RS l ANY 2000 and prior ADM/EDM/JDM Subaru, 2001–2002 (and some 2003) ADM/EDM/JDM non-WRX/STi models l ANY Subaru with a diesel engine 5) When your select “read from ecu” in ECUflash or the read icon, a list box will appear from which you must select the correct read method that according to your vehicle. If select incorrect read method, the download will fail. 6) When the system asks for an update, select “NO” and install the software automatically 7) Make sure your car’s battery, charging and electrical system is up to snuff. Reading or flashing ECU will draw power from battery. As FVDI Commander products are upgraded to new versions, I often receive emails from customers asking about software and driver upgrade recently. Most of them are inquiring about FVDI Renault. The driver in FVDI products are actually the same. So here I would like to write a quick guide about updating FVDI driver to latest 2015.6.2 version.
If your FVDI driver is 2.10 version: 1.Please download the following FVDI driver upgrade zip package: https://www.sendspace.com/file/xfkdxp 2.Once the package is downloaded, please check the video below, FVDI_NEW_Download_V2015_6.2_install_video, https://www.youtube.com/watch?v=I7wkbz_eO-Q&feature=youtu.be and follow it to install and update the driver. There is an authorized file and installation guide of the package in Step 1, showing you how to update the driver. If your FVDI driver is 2.08.14 version: Please download the FVDI V2015.6.2 install video above (Step 2) and follow the video to perform the installation and update.
If the driver version is after 2014.12: If you have the 2014.12 driver and the new version disk, please follow the video below to update the driver:
https://www.youtube.com/watch?v=I7wkbz_eO-Q&feature=youtu.be Note: You can only activate authorization for the FVDI product you bought, for example, if you bought Renault FVDI commander, please click the Renault logo for activation. 1.To run VVDI software V2.8.1, you need to update the newest firmware Following the steps to update firmware to the newest version: Open VAG Vehicle Diagnostics Interface (VVDI) V2.8.1, click Options – Update online
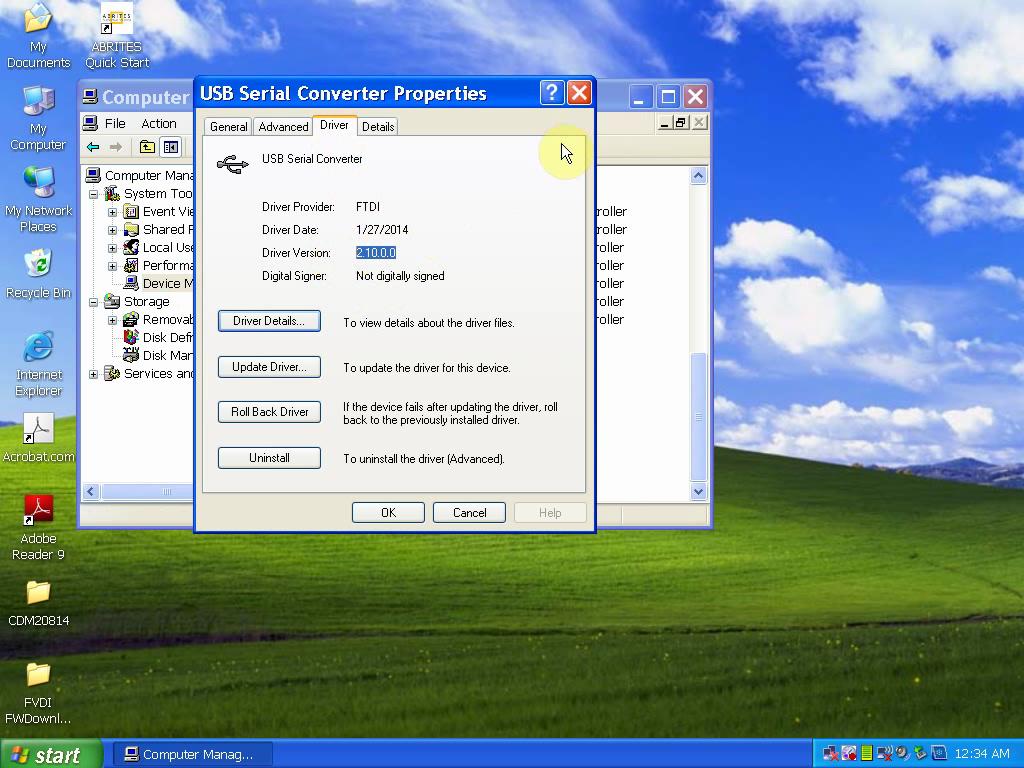
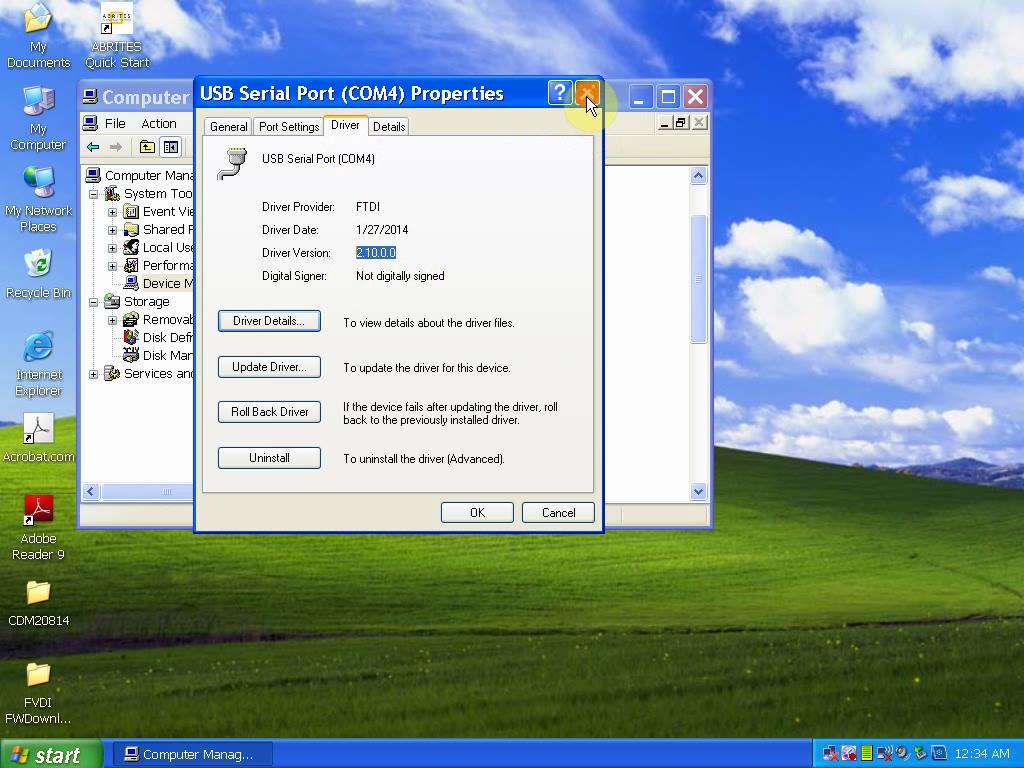
2. Fix the bug that generates special transponder ID42 3.Upate Immobilizer Data Tool: Support all lists cars. Add Euro cars:Alfa Romeo, Aprilia, Aston Martin, Audi, Bentley, BMW, Citroen, Dacia, DAF, Ducati, Ferrari, Fiat, Gilera, Iveco, Jaguar, Lancia, LDV, MAN, Maserati, Mercedes Benz, Opel, Peugeot, Piaggio, Polonez, Porsche, Renault, Rover, Saab, Scania, Seat, Skoda, Smart, TagAZ, UAZ, VAZ, Volvo, VW 4.Fix bug for immobilizer data tool 5.Update remote database, support more car: Sonata 315 311 remote control, the Chevrolet Aveo 6. Other bugfix Free Download VVDI software 2.8.1 at: http://down.eobd2.fr/vag-vehicle-diagnostics-interface-setup-V2.8.1.rar 1. Check the driver version of USB Serial Converter and USB Serial Port: My Computer – Manage – Device Manager – USB Serial Converter – Properties – Driver – Driver version V2.10.0.0 ; then move mouse to USB Serial Port - Properties – Driver – Driver version V2.10.0.0
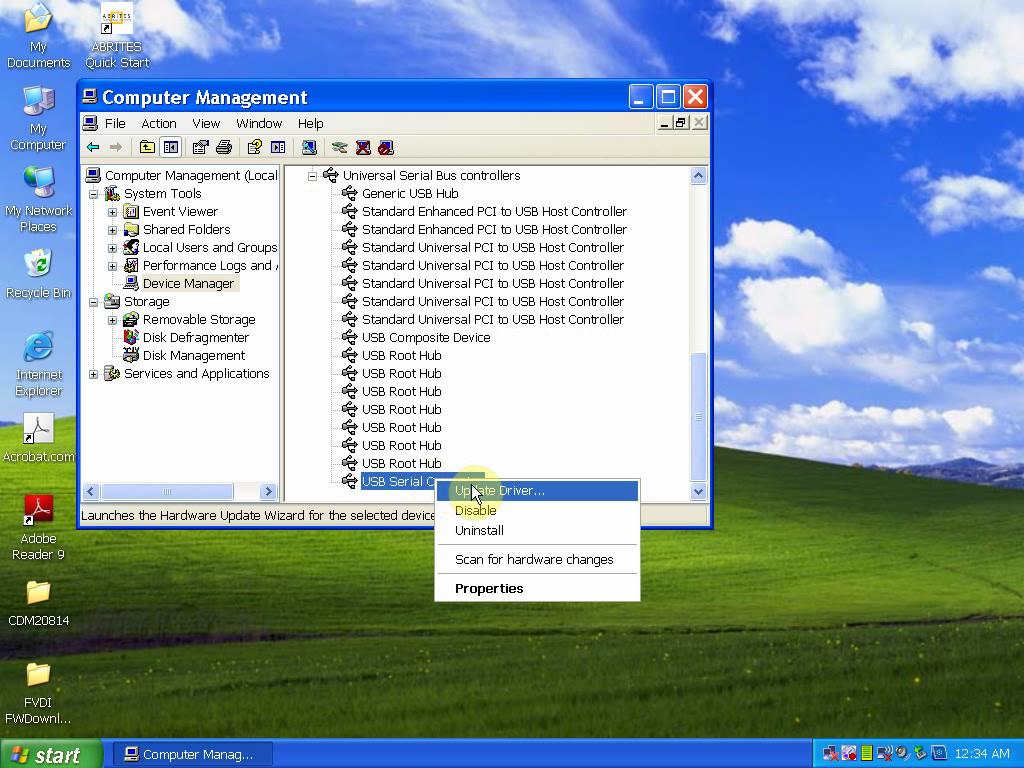
2. Update Driver V2.10.0.0 to V2.8.14.0 Right click USB Serial Converter; choose Update driver, a window pops up prompting Hardware Update Wizard, step – by-step complete the hardware Update Wizard. (Note: please choose folder "CDM20814" to put into the driver.) Then right click “USB Serial Converter ", choose Properties, check driver version whether it is 2.8.14.0.
Right click “USB Serial Port", choose Update driver, a window pops up prompting Hardware Update Wizard, step – by-step complete the hardware Update Wizard. (Note: please choose folder "CDM20814" to put into the driver.) Right click “USB Serial Port", choose “uninstall" 3.Connect FVDI main unit to the Computer and a window pops up “Found New Hardware”, then step-by-step finish installing the software for USB Serial Port. Check “USB Serial Port" driver version, whether it is V2.8.14.0 Done To watch video tutorial, please click 1. Check the driver version of USB Serial Converter and USB Serial Port: My Computer – Manage – Device Manager – USB Serial Converter – Properties – Driver – Driver version V2.10.0.0 ; then move mouse to USB Serial Port - Properties – Driver – Driver version V2.10.0.0
2. Update Driver V2.10.0.0 to V2.8.14.0 Right click USB Serial Converter; choose Update driver, a window pops up prompting Hardware Update Wizard, step – by-step complete the hardware Update Wizard. (Note: please choose folder "CDM20814" to put into the driver.) Then right click “USB Serial Converter ", choose Properties, check driver version whether it is 2.8.14.0.
Right click “USB Serial Port", choose Update driver, a window pops up prompting Hardware Update Wizard, step – by-step complete the hardware Update Wizard. (Note: please choose folder "CDM20814" to put into the driver.) Right click “USB Serial Port", choose “uninstall" 3.Connect FVDI main unit to the Computer and a window pops up “Found New Hardware”, then step-by-step finish installing the software for USB Serial Port. Check “USB Serial Port" driver version, whether it is V2.8.14.0 Done To watch video tutorial, please click Here is the step-by-step instruction on how to program central door locking remote fob with Op-com diagnostic interface. Vehicle model example: 2003 Astra-G Tool: Op-com CAN OBD diagnostic interface (cheap €17 in eobd2.fr) A laptop running Windows XP mode NOTE: If it does not program then it’s the wrong fob. 1) Insert CD software into the laptop and install op-com software, here is the software installation video instruction. https://www.youtube.com/watch?v=lo0KPzxQnC0
2) Come into the main function menu after succeed install software. Select “Diagnostic” in the function list.
3) Select your vehicle year, here “2003”
4) Select vehicle model, here “Asfra-G”
5) The next program will display the ECU module that Op-com accessed. Select “Body”
6) If you have an alarm, then go to the “Anti Theft Warming”. If you don’t, then select “Central Door Lock”.
7) Come to “Measuring blocks”, the system will display the remote that was used and the previous one.
8) Select “Programming”, if necessary, erase all remote keys.
9) Select “Program Remote Key” and click the button to add the key you want to remote.
10) When first remote generated, you can continue to program another remote. The result can be displayed on “Measuring blocks”. No security code needed when programming the remote. NOTE: If the device still not working, the OBD2 port does not meet the 12 pin diagnostic socket. |


 RSS Feed